Crafting For – Grads –

It’s that time of the year people – time for graduation, of high school, of college, of a big time in you life.  

Let’s celebrate those going through this important time with you – grad parties.

With grad parties comes presents… What do you get a graduate?  What do they need?… Well, since you asked, a graduate needs memories…a reminder of all the things (small or large) that helped them get to this significant point in their life.

A memory jar.  A place to keep all your past memories that helped shape you and to add your new memories that you want to remember forever and always. A place you can go to, pull out a random memory and remember the beauty of that certain memory.  

What you need to create the memory jar-
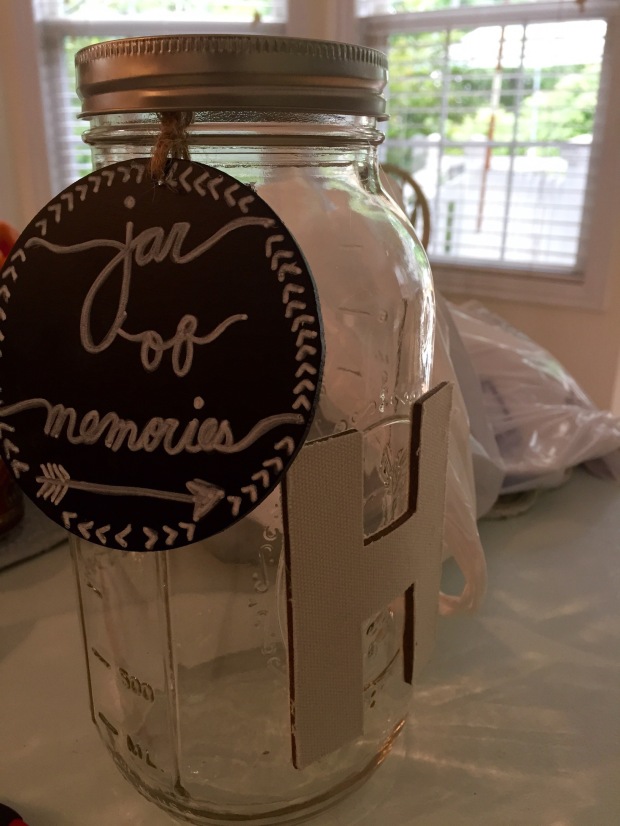
  • A Glass Jar
  • Initials (based on person gift is for)
  • Chalk Marker
  • Chalk Cirle 
  • Hot Glue Gun + Glue
  • Paper
  • Pens/ Markers


How to build the memory jar-

  1. Use the hot glue gun to glue the initial onto the glass jar
  2. Use the hot glue gun to glue on the chalk cirle to the glass 
  3. Use the chalk marker for the chalk circles & write what you please – I chose to call it, Jar of Memories – and on the back I wrote the date I made in    
  4. The final step is to write memories on paper, fold the paper & place in jar

Congrats you have now given your graduate a memory jar that will keep them smiling for the rest of their life.

Always remember the past

“Sometimes you will never know the value of a moment until it becomes a memory”
-Dr. Seuss-

Always cherish the moment 

“Cherish every moment and every person in your life, because you will never know when it will be the last time you see someone”
-Unknown-

Always hope for the future

“Hope is being able to see that there is light despite all the darkness”
-Desmund Tutu-

DIY – St. Patty’s Day Style

St Patrick’s Day is coming up so here’s a minty drink for a lucky day!  I’ll provide you with a homemade version of the popular: Shamrock Shake.  Lucky Charm marshmallows are added to give it a beautiful rainbow look!

I got this idea from: Brooke MClay who is a professional recipe developer, food photographer and food writer (www.coupons.com/thegoodstuff/lucky-charms-shamrock-shake-exclusive-recipe/?pp=1)

Follow the lovely rainbow (my directions) and maybe you will find the lucky pot of gold (finished product) at the end!

Ingredients:

  • 2 cups – vanilla ice cream
  • Green Sprinkles (you can use as much as you need)
  • Honey (you can use as much as you need)
  • Lucky Charms (marshmallows only)
  • 1/4 TSP – mint extract
  • 3 squirts – green food coloring
  • Whipped Cream
  • Paper Straws

Directions:

Use the honey and green sugar to rim the jars.  Set aside for later use.  Pick the marshmallows out of the lucky charms, the cereal will be of no use in this.  Set aside for topping at the end.  Use a blender to puree vanilla ice cream, milk, mint extract, and green food coloring.  Pour blended product into your honey & sugar rimmed jars.  Use the whipped cream to top the shake.  Now add the Lucky Charm marshmallows to top the green, shamrock shake off.  Serve and enjoy with family and friends (or just yourself!) 🙂

Step One:  The Ingredients

IMG_8801

Lucky Charms Cereal, Vanilla Ice Cream, Mint Extract, Green Food Coloring, Green Sprinkles, Honey, Whipped Cream & Paper Straws

Step Two:  Separate the Charms

IMG_8821

You will need lucky charms, the important part being the marshmallow charms.  So, pick out all the colorful marshmallow pieces, which is something you’ve probably always wanted to do so have fun with it…But don’t get the urge to eat them, you need them!!

Step Three:  Honey & Sprinkles & Cute Jars

Squirt the honey onto a plate, rim the top of your jar with the honey (sticky I know!)  Pour some of the green sprinkles into a bowl.  Then place the top of your sticky honey jar into the sprinkles, adding a pop of a beautiful green color to your dessert.

IMG_8828

Step Five:  Mix & Blend

Puree the vanilla ice cream, milk, mint extract, and the green food coloring in a blender.  I used about 2 cups of the vanilla ice cream, 1/3 cup of the milk, 1/4 TSP of the mint extract and three squirts of the green food coloring.  The mint extract depends on your liking of mint, if you like mint you can add more, if you don’t like it as much you don’t have to add as much.

Step Six:  Top & Finish

Use the whipped cream and the colorful lucky charm marshmallows to top off the drink and then you’re ready to enjoy this lovely drink with your family and friends!

IMG_8834

Luck of the Irish to ya!

Let’s Get Crafting!

Hello!  I thought it would be time for me to start showing you some of my easy DIY projects.  The first project I’m going to show you is something you can make for your friends, your family or even yourself!  I made this for my friend’s birthday because she is obsessed with Disney and this is a Disney based project, so if you love Disney this is for you.

You do not have to be artistically superior, you can, in fact, be quite the opposite to be able to do this!  As Walt Disney once said, If you can dream it, you can do it!”

FullSizeRender-2

What you will need:

  • Paint brushes – I used a large brush, a medium-sized brush and a tiny brush
  • Paint – you can use whatever colors you would like, I used a periwinkle & black
  • Canvas – any size

Steps:

  1. I like to sketch what I’m trying to make before I start painting – so you can sketch it firstFullSizeRender-4
  2. Paint the background the color of your choice (in my case – periwinkle) — using the large paint brushFullSizeRender
  3. If you used step 1, cut out your sketch, place it on your painted canvas and trace lightly with a pencil
  4. Paint on the Disney castle and name (or any other design you used) — using the medium paint brushFullSizeRender-3
  5. You can stop now, or you can continue, using the small paint brush to make the edges of your design neat & clean
  6. You’re finished! You have now created a Disney master piece that Walt Disney, himself, would be proud of!!FullSizeRender-2